InterestingTitleBar源码
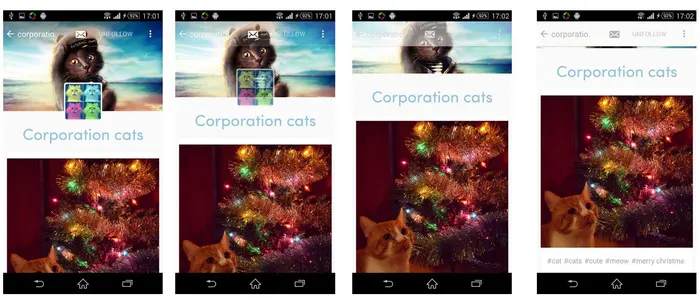
轻博客应用Tumblr中,在看他人的主页时候,可以看到顶部title bar的一个很酷炫的体验,当在最顶端,整个title bar的背景是透明的,而上面的字体和图标是白色的,随着逐渐滑下来,背景逐渐不透明变白,而图标及字体则渐渐灰起来。如下图

整个滑动的效果很好。
那么这个效果是怎么实现的呢。秘密自然都在listview的onScroll上。根据firstVisibleItem来判断是否需要对事件进行对应处理,如果滑到了下面,cover不可见了,自然没有必要再去处理。
1 2 3 4 5 6 7 8 9 10 11 12 13 14 15 16 17
|
@Override
public void onScroll(AbsListView view, int firstVisibleItem, int visibleItemCount, int totalItemCount) { if (firstVisibleItem <= 1) { View v = view.getChildAt(0);
int top = (v == null) ? 0 : v.getTop(); if (mCompleteFadePosition <= 0) { mFadeDuration = CoverSettings.getCoverVisibleHeight() / 2; mCompleteFadePosition = (mHeaderView.findViewById(R.id.user_info_header_panel).getBottom() + CoverSettings.getCoverPadding() - ViewUtils.dpToPx(getResources().getDimension(R.dimen.title_bar_main_content_height))); }
int delta = top + mCompleteFadePosition; mTitleBarAlpha = interpolate(delta); setTitleBarTranslate(mTitleBarAlpha); } }
|
interpolate函数根据当前滑动到的位置,来计算需要对应处理的alpha值,setTitleBarTranslate来做具体的ui修改。
1 2 3 4 5 6 7 8 9 10 11 12 13 14 15 16 17 18 19 20 21 22 23 24
|
* Specify an alpha value for the title bar. 0 means fully transparent, and * 255 means fully opaque. */
public void setTitleBarTranslate(int alpha) { if (mTitleBarView == null || mTitleBarView.getBackground() == null) { return; } mTitleBarView.getBackground().setAlpha(alpha); if (mBarTitleText == null) { return; } if (alpha != 0) { setTitleBarShadowLayer(0); } else { setTitleBarShadowLayer(1f); } if (alpha >= MAX_ALPHA) { setTitleBarColor(ORIGIN_COLOR); } else { setTitleBarColor(ColorUtil.interpolateColor(Color.WHITE, mOriginBarTitleColor.getDefaultColor(), alpha, MAX_ALPHA)); } }
|
setTitleBarShadowLayer是给字体加上阴影,防止在最顶部透明时,纯白背景下白色字会看不清。
setTitleBarColor则是大头,对图标以及字体进行颜色修改。
1 2 3 4 5 6 7 8 9 10
|
private void setTitleBarColor(int color) { if (color == ORIGIN_COLOR) { mBarTitleText.setTextColor(mOriginBarTitleColor); } else { mBarTitleText.setTextColor(color); } setViewColor(mBarRightFriendView, color); setViewColor(mBarLeftSettingButton, color); } }
|
分别写textview和button的setViewColor方法,这里颜色的变化是通过万能的ColorFilter来实现的,模式则使用了PorterDuff.Mode.SRC_ATOP。
1 2 3 4 5 6 7 8 9 10 11 12 13 14 15 16 17
|
private void setViewColor(Button button, int color) {      if (color == ORIGIN_COLOR) {          button.setTextColor(mOriginBarTitleColor);          button.getBackground().clearColorFilter();      } else {          button.setTextColor(color);          button.getBackground().setColorFilter(color, PorterDuff.Mode.SRC_ATOP);      }  }
private void setViewColor(TextView textView, int color) {      if (color == ORIGIN_COLOR) {          textView.setTextColor(mOriginBarTitleColor);      } else {          textView.setTextColor(color);      }  }
|
险些忘了interpolateColor,会根据位置在原色值和目标最终色值之间根据位置来做映射(任意颜色的图标都能渐变)。
1 2 3 4 5 6 7
|
public static int interpolateColor(int colorFrom, int colorTo, int posFrom, int posTo) { float delta = posTo - posFrom; int red = (int)((Color.red(colorFrom) - Color.red(colorTo)) * delta / posTo + Color.red(colorTo)); int green = (int)((Color.green(colorFrom) - Color.green(colorTo)) * delta / posTo + Color.green(colorTo)); int blue = (int)((Color.blue(colorFrom) - Color.blue(colorTo)) * delta / posTo) + Color.blue(colorTo); return Color.argb(255, red, green, blue); }
|
