Keras Tensorflow tutorial: Practical guide from getting started to developing complex deep neural ne
1. Why Keras?
- Light-weight and quick: Keras is designed to remove boilerplate code. Few lines of keras code will achieve so much more than native Tensorflow code. You can easily design both CNN and RNNs and can run them on either GPU or CPU.
- Emerging possible winner: Keras is an API which runs on top of a back-end. This back-end could be either Tensorflow or Theano. Microsoft is also working to provide CNTK as a back-end to Keras. Currently, the world of Neural Network is very fragmented and evolving very fast. Look at this tweet by Karpathy:
2. How to Install Keras with Tensorflow:
a) Dependency:
Install h5py for saving and restoring models:
Other python dependencies need to be installed.
If you don’t have Tensorflow installed, please follow this Tensorflow tutorial to install Tensorflow. Once, you have Tensorflow installed, you can simply install Keras using PyPI:
Checking the Keras version.
Note that, the value of image_data_format is “channels_last”, which is the correct value for Tensorflow. In Tensorflow, images are stored as Tensors/arrays of shape [height, width, channels] while in Theano the order is different [channels, height, width]. So, if you don’t have this parameter set correctly, your intermediate results will be very strange. For Theano, this value will be “channels_first”.
So, now you are ready to use Keras with Tensorflow.
3. Keras Tensorflow Tutorial: Fundamentals of Keras
Keras has two distinct ways of building models:
- Sequential models: This is used to implement simple models. You simply keep adding layers to the existing model.
- Functional API: Keras functional API is very powerful and you can build more complex models using it, models with multiple output, directed acyclic graph etc. In the next sections of this blog, you would understand the theory and examples of Keras Sequential Model and functional API.
4. Keras Sequential Model
We can add layers like Dense(fully connected layer), Activation, Conv2D, MaxPooling2D etc by calling add function.
Here is how you can add some of the most popular layers to the network. I have already written about most of these layers in this convolutional network tutorial:
1. Convolutional layer: Here, we shall add a layer with 64 filters of size 3*3 and use relu activations after that.
2. MaxPooling layer: Specify the type of layer and specify the pool size and you are done. How cool is that!
3. Fully connected layer: It’s
called Dense in Keras. Just specify the number of outputs and you are done.
4. Drop out:
5. Flattening layer:
Taking input:
In this case, the input layer is a convolutional layer which takes input images of 224 * 224
* 3.
If you want to specify stochastic gradient descent and you want to choose proper initialization and other hyperparameters:
Now that we have created the model; let’s feed the data to the model via the fit function. You can also specify the batch_size and the maximum number of epochs you want training to go on.
Finally, let’s use the evaluate function to test the model
These are the basic building blocks to use the Sequential model in Keras. Now, let’s build a simple example to implement linear regression using Keras Sequential model.
4.1 Solve a linear regression problem with an example
Problem statement:
a) Creating training data:
b) Create model:
This will take input x and apply weight, w, and bias, b followed by a linear activation to produce output.
Now, we shall train this linear model with our training data of trX and trY, where trY is 3 times of trX, so this value of weights should become 3.
Finally, we feed the data using fit function
Now, we print the weight after training:
As you can see, the weights are very close to 3 now. This ran for 200 epochs. Feel free to change the number of epochs to 100 or 300 to see how this affects the output. We are now able to build a linear classifier using Keras with very few lines of code while we had to deal with sessions and placeholders to do the same using native Tensorflow in this tutorial.
5. Saving and restoring pre-trained weights using Keras:
HDF5 Binary format:
Saving weights:
Restoring pre-trained weights:
6. Functional API:
Sequential models are good for simpler networks and problems, but to build real-world complex networks you need to understand functional API. In most of the popular neural networks, we have a mini-network(a few layers arranged in a certain way like Inception module in GoogLeNet, fire module in squeezeNet) and this mini-network is repeated multiple times. Functional API allows you to call models like a function as we do for a layer. So, you can build a small model which can be repeated multiple times to build the complete network with even fewer lines of code. By calling a model on a tensor, you can reuse the model as well as weights.
Let’s see how it works. First, you need to import differently.
Now, you start by specifying the input, as opposed to mentioning the input at the end of the fit function, as done in Sequential models. This is one of the notable difference between Sequential models and functional API. Let’s declare a tensor of shape 28 * 28 * 1 by using Input().
Now, let’s say we apply a convolutional layer using the Functional API, we shall have to specify the variable on which we want to apply the layer. This looks like this(see, how we specify the input to the layer):
Finally, we create a model by specifying the input and output.
Of course, one will also need to specify the loss, optimizer etc. using fit and compile methods, same as we did for the Sequential models.
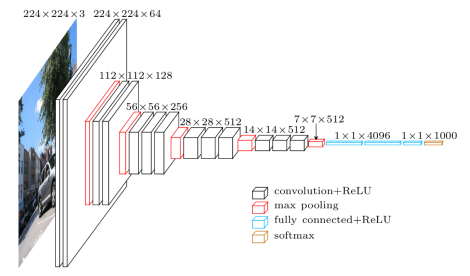
Let’s just use what we have just learned and build a vgg-16 neural network. It’s a rather old and large network but is great for learning things due to its simplicity.
6.1 Develop VGG convolutional neural network using functional API:
VGG:

Vgg 16 architecture
The complete code is provided in vgg16.py.
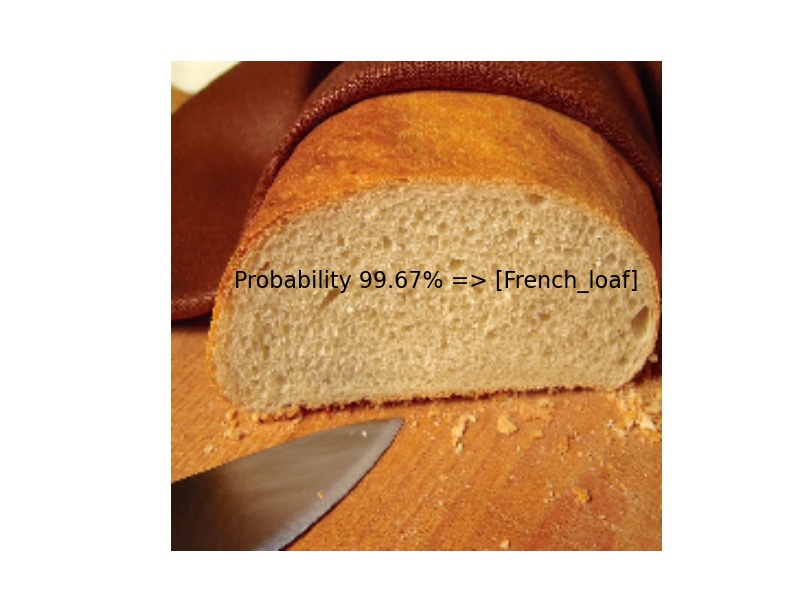
In this example, let’s run imageNet predictions on some images. Let’s write the code for the same:
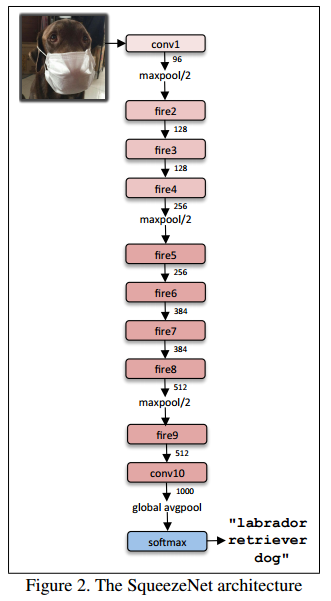
6.2 Build and run SqueezeNet convolutional neural network using functional API:
SqueezeNet:
SqueezeNet fire module
Now, this Fire Module is repeated used to build the complete network which looks like this:

We can easily convert this code into a function for reuse:
Modular function for Fire Node
The complete network architecture is defined in squeezenet.py file. We shall download imageNet pre-trained model and run prediction using this model on our own image. Let’s quickly write some code to run this network:
Hopefully, this tutorial helps you in learning Keras with Tensorflow. Do me a favour, if you find this useful, please share with your friends and colleagues who are looking to learn deep learning and computer vision. Happy Learning!
原文地址: http://cv-tricks.com/tensorflow-tutorial/keras/

